Installation
Rooftop Tent & Overland Accessories Installation Guide
ROOFTOP TENTS:
You've got your Go Overland Canada Rooftop tent, and you're ready to get Elevated.
The total installation time is usually between 5-10 min, however if you have a very low profile rack, it can take up to 30 minutes. If you have any specific questions not covered below, send us an email info@gooverland.ca
First step is to open the tent completely and take out all the parts, boxes and/or bags that are inside. Make sure to check all the corners and even under the mattress as sometimes things move around in transit and can be hidden.
Then, ask a friend, your partner, or a couple of neighbours to help you lift the tent up and onto your crossbars of your vehicle. Congratulations once this is done as it's the hardest part!
Please note the Nut + Bolt are M8 x 12 spec
Universal Hardware (all tents other than the Trek)

Step 1 Put bolts inside silver plates, then slide the plate + bolt into channel (Trek does not have the silver plates)
Step 2 Lift tent and slide bolt so it's on either side of the crossbars
Step 3 Put bracket through the bolts and centre it to the crossbar
Step 4 Tighten the nuts. For extra security, you can purchase lock nuts to prevent theft, or lock nuts to avoid these nuts shaking loose during regular offroading.
Step 5 Insert end caps in the channels
Length of mounting rails:
- 180cm/70.86inches: Expedition XL, Summit, Odyssey, Explorer X, Traverse, Journey X Lite
- 150cm/59.05inches: Expedition Mini
- 135cm/53.14inches: Voyage
Distance between mounting rails: 66cm/25.98inches (centre to centre)
Height of the mounting rails: 2.5cm/0.98inch
Rainfly / Awning Poles on all models:
The poles for the rainfly / awning need to be inserted deep inside of the channel, not just into the hole. If the pole does not reach the channel, the rainfly will sag.
Step 1: slide pole into hole on an angle to ensure it gets into the channel. Use a flashlight to see the location of the channel if you cannot located it easily.
Step 2: after the pole is inserted in the channel, grab the corner of the rainfly and attach/slide (depending on model) pole to the fabric.
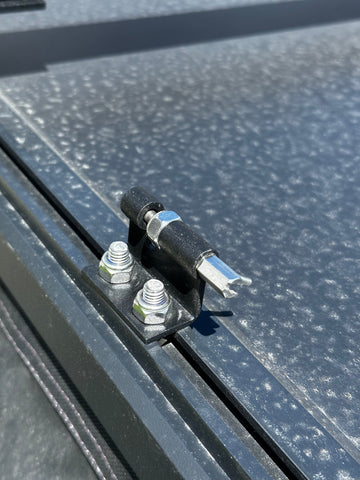
Crossbars:
Use a measuring tape to ensure equal spacing. (Photo 1) M8 square nuts slide into channel. Use provided allen key to secure screws into place.


Winter Insulation Kit: simply hook the insulation kit onto the internal frame/perimeter where there are preset eyelets.
CANOPY / AWNING

EXPEDITION MODELS:

Explorer X Only
You would have received two metal pieces which are to be used for heavy snow or heavy wind to attach to two of the hydraulic arms preventing it from closing or moving too much. Install these on opposite ends (one front, one back)

Expedition annex room installation: video here The key step is to find the provided Velcro’s and attach to your rooftop tent. If the velcro is not attached there will be a gap.
VOYAGE LADDER + CROSSBARS
*see below for ladder mount. Be cognizant of which way the tent will open / unfold so you install it on the correct side.
Voyage Crossbars

Xpedition XL & Mini extra poles: can be used to create more of a ceiling on heavy snow days, stormy weather, or when extra support is required. It’s not mandatory to use.

If anything isn’t covered here and you have any questions, please email us at info@gooverland.ca and we’ll get back to you within 24 hours.